Spring Boot – Spring data JPA

In this tutorial, we will learn how to use Spring Boot with Spring data JPA to save data into an H2 in-memory database and how to also how to query the data.

Final Project Structure : Will look like this

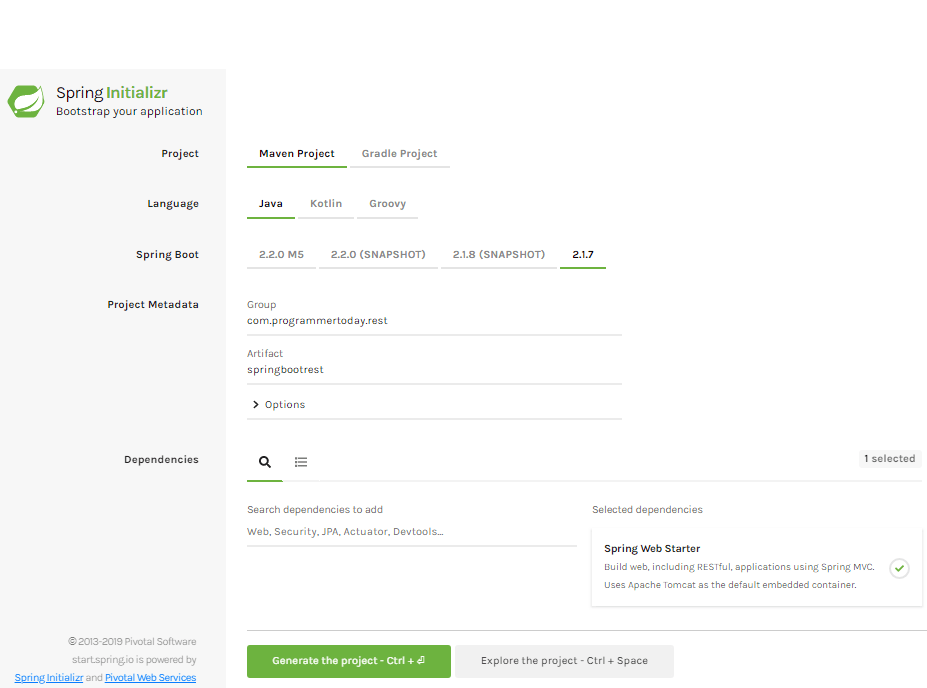
1. Add Maven Dependency Or use Spring Initializr

Add the 2 dependencies (spring data jpa and h2 in-memory database) and generate the project if using spring initializr Or you can also add them directly to spring boot pom.

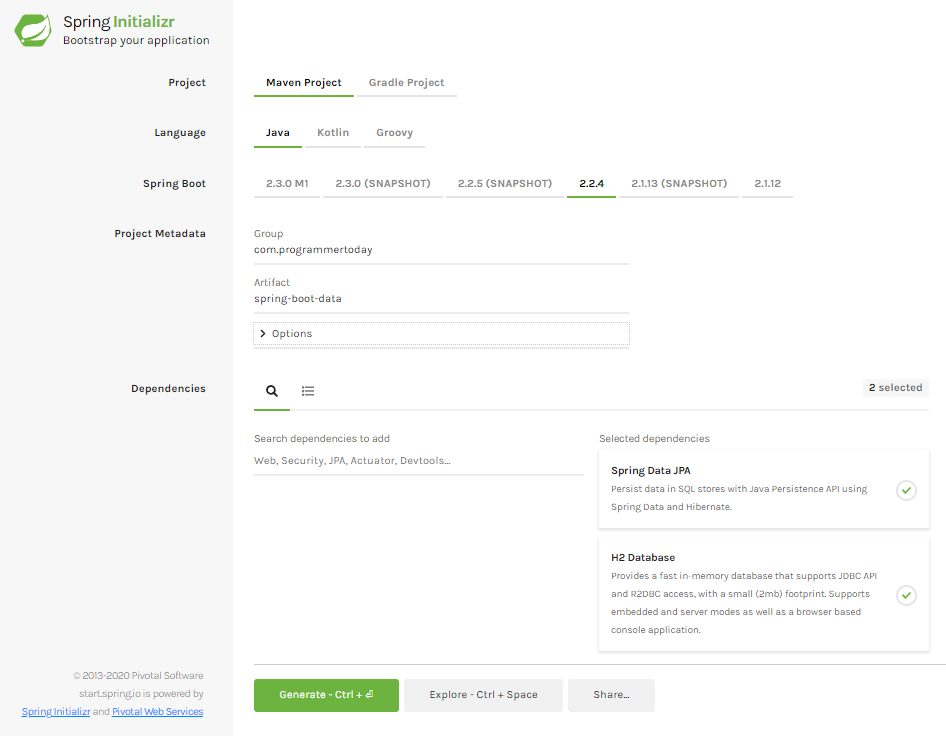
Also add an embedded server like tomcat for the application to run, you must add a Spring Web dependency for adding tomcat in the application Or just type tomcat in spring initializr website.

So the pom.xml file will look like this.


<?xml version="1.0" encoding="UTF-8"?>
<project xmlns="http://maven.apache.org/POM/4.0.0" xmlns:xsi="http://www.w3.org/2001/XMLSchema-instance"
  xsi:schemaLocation="http://maven.apache.org/POM/4.0.0 https://maven.apache.org/xsd/maven-4.0.0.xsd">
  <modelVersion>4.0.0</modelVersion>
  <parent>
     <groupId>org.springframework.boot</groupId>
     <artifactId>spring-boot-starter-parent</artifactId>
     <version>2.2.4.RELEASE</version>
     <relativePath/> <!-- lookup parent from repository -->
  </parent>
  <groupId>com.programmertoday</groupId>
  <artifactId>spring-boot-data</artifactId>
  <version>0.0.1-SNAPSHOT</version>
  <name>spring-boot-data</name>
  <description>Demo project for Spring Boot</description>

  <properties>
     <java.version>1.8</java.version>
  </properties>

  <dependencies>
     <dependency>
        <groupId>org.springframework.boot</groupId>
        <artifactId>spring-boot-starter-data-jpa</artifactId>
     </dependency>
     <dependency>
        <groupId>com.h2database</groupId>
        <artifactId>h2</artifactId>
        <scope>runtime</scope>
     </dependency>
     <dependency>
        <groupId>org.springframework.boot</groupId>
        <artifactId>spring-boot-starter-web</artifactId>
     </dependency>
     <dependency>
        <groupId>org.springframework.boot</groupId>
        <artifactId>spring-boot-starter-test</artifactId>
        <scope>test</scope>
        <exclusions>
           <exclusion>
              <groupId>org.junit.vintage</groupId>
              <artifactId>junit-vintage-engine</artifactId>
           </exclusion>
        </exclusions>
     </dependency>
  </dependencies>

  <build>
     <plugins>
        <plugin>
           <groupId>org.springframework.boot</groupId>
           <artifactId>spring-boot-maven-plugin</artifactId>
        </plugin>
     </plugins>
  </build>

</project>

2. Create : Spring Data Entity

Create an entity called Employee.class

package com.programmertoday.entities;

import javax.persistence.*;
import java.io.Serializable;

@Entity
@Table(name = "Employee")
public class Employee implements Serializable {

   private static final long serialVersionUID = -1798070786993154676L;

   @Id
   private Integer id;

   @Column(name="name")
   private String name;

   @Column(name="address")
   private String address;

   public int getId() {
       return id;
   }

   public void setId(int id) {
       this.id = id;
   }

   public String getName() {
       return name;
   }

   public void setName(String name) {
       this.name = name;
   }

   public String getAddress() {
       return address;
   }

   public void setAddress(String address) {
       this.address = address;
   }

}

3. Spring Data Repository

Create a Spring Data Repository Interface like below and go to the next step.

Here we created a Repository which Spring Data JPA has provided and extend a CrudRepository which provides us some boilerplate code and functionalities which helps us interact with the database just like a normal JPA or Hibernate would do.

package com.programmertoday.repositories;

import com.programmertoday.entities.Employee;
import org.springframework.data.repository.CrudRepository;

public interface EmployeeRepository extends CrudRepository<Employee,Integer> {
}

4. Connection with H2 in-memory database

Just add the below 2 properties for h2 db:

spring.h2.console.enabled=true
spring.h2.console.path=/h2

Also, Just For Testing Create two sample .sql scripts to create an Employee table and insert 2 records into that table on application load or startup.

Create 2 scripts as shown in the snapshot below:

Script.sql

Drop table if exists Employee;
Create table (id number , string name, string address);

Data.sql

insert into Employee (id,name,address) values (1,'John','US');
insert into Employee (id,name,address) values (2,'Mak','UK');

5. Run Main method – @SpringBootApplication

Now just open the main class and run it.

Voila ! 

Your SpringBoot Spring Data JPA application is up and running @ <localhost:port>

Default port will be 8080 [ example : localhost:8080 ]

When you run the main class of SpringBootApplication, you see the below log in the console which also tells you that the h2 in-memory data base is up and runnning at url “localhost:port/h2”

2020-01-26 21:11:55.948  INFO 22204 — [   main] o.s.b.a.h2.H2ConsoleAutoConfiguration    : H2 console available at ‘/h2’. Database available at ‘jdbc:h2:mem:testdb’

Summary

In this tutorial, we learnt about Spring boot capabilities with Spring DATA JPA as a JPA framework. We connected with H2 in-memory database to save/persist data into the database and it’s easy to test.
Hope you liked it !


Difference between @Controller and @RestController annotation

Spring’s @Controller and @RestController Annotations

Controller : In Spring the incoming request are handled by the controllers, in terms of a web based application it is the servlet which is responsible for identifying a correct controller url.

S.No@Controller@RestController
1Typically used in spring mvc applicationsTypically Used in RESTful Web Services/AJAX calls which demand response in specific format like(eg: json, xml).
2It is just @Controller , response body need to be added explicitly.It is a combination of @Controller + @ResponseBody,
It does the job in single statement.
3It typically sends data to a view resolver in html format and is used with technologies like the JSP or FTL.
To send response to REST based or AJAX calls @ResponseBody annotation is used along with @Controller.
It typically sends data back to applications like REST based or AJAX calls which is actually looking for a JSON type response and does not rely on view resolvers.
In such cases use @RestController
4If you see the code within.

@Target(value=TYPE) @Retention(value=RUNTIME) @Documented @Component public @interface Controller { //….. }
If you see the code within.

@Target(value=TYPE) @Retention(value=RUNTIME) @Documented @Controller @ResponseBody public @interface RestController { //….. }

Examples

1. @Controller – Usage in spring mvc application

@Controller
@RequestMapping("department")
public class DepartmentController
{
    @RequestMapping(value = "/{name}", method = RequestMethod.GET)
    public Department getDepartmentByName(@PathVariable String name, Model model) {
  
        //pull data, set in model and then return the template
  
        return departmentTemplate;
    }
}        
        

2. @Controller + @ResponseBody in spring

@Controller
@ResponseBody
@RequestMapping("department")
public class DepartmentController
{
    @RequestMapping(value = "/{name}", method = RequestMethod.GET, 
                    produces ="application/json")
    public Department getDepartmentByName(@PathVariable String name) {
  
        //pull data, set model and then return Object model in json format
  
        return department;
    }
}
        

3. @RestController in spring

@RestController
@RequestMapping("department")
public class DepartmentController
{
    @RequestMapping(value = "/{name}", method = RequestMethod.GET, 
                    produces ="application/json")
    public Department getDepartmentByName(@PathVariable String name) {
  
        //pull data, set model and then return Object model in json format
  
        return department;
    }
}                
        

This code does the same job as in example 2 , here we use single annotation(@RestController) instead of two(@Controller, @ResponseBody).

Spring’s @RequestMapping annotation

This annotation is used to provide routing information or you can understand in a simple way it allows application to understand different apis with the help of URL, a unique URL for every api.

A sample code is here:

@RestController  
public class HomeController {  
@RequestMapping(value = "/allDepartmentNames", method = "GET")  

    public List getAllDepartmentName(){  
  //….
        return list;  
    }  
}                
        

Summary

In this spring boot annotations tutorial you have learnt about annotations and auto configuration features of spring boot. These are few of the most in use annotations which you might surely use in your spring boot application. Hope you liked it !


Spring Boot microservices

This post will make you understand the basics of microservices and its architecture.

What you get to know :

  • What is a Monolith application?
  • What is a Microservice?
  • What are the Challenges with Microservices?
  • How does Spring Boot and Spring Cloud make developing Microservices easy?

What is a Monolith Application?

If you have ever worked in a project of this sort where

  • A team is of size say more than 20 working for it
  • Application is of hundred thousands of lines of code.
  • The application has wide range of functionalities
  • Debugging is a big challenge
  • Introducing a new technology is a big challenge or nearly impossible.
  • And you release it to production one each month

Then the application has characteristics of a Monolith application.

Challenges which are faced here :

  • Scalability one of the greatest Challenges.
  • Difficulty in new Technology Adoption/introduction.
  • Adapt new Processes – like Agile?
  • Difficult to Automate Tests.
  • Difficult to Adapt to Modern Development Practices

Microservices

To overcome the challenges faced in Monolith application came the Microservices, which are scalable and easy to adapt to new technologies.

So what are Microservices ?

As defined by some experts, Developing an application as a suite of small services Each running in its own process and communicate with light weight mechanism(often as HTTP resource APIs). These services are independently deployable by automated systems and these may use independent or different data storage technologies.

So a few important characteristics which defines a microservice can be :

  • Small units which do their job and are easily deployable.
  • They communicate via HTTP REST calls or triggered event based.
  • Which are easily scalable.

Advantages of Microservices

  • New Technology & Process Adaption becomes easier. You can try new technologies with each microservice that we create.
  • Faster Release Cycles – You can adopt agile development methods, create microservices which are easy to maintain and deploy.
  • Scaling with Cloud is really simple.
  • Easy Automation Testing because of smaller units of microservices.
spring boot monolith-architecture

Vs

spring-boot-microservices-architecture-vs-monolith-architecture

Challenges in Microservice Architectures

While developing a number of smaller components might look easy, there are a number of inherent complexities that are associated with microservices architectures.

Lets look at some of the challenges:

  • Fast Setup needed : You cannot spend a month setting up each microservice. You should be able to create microservices quickly.
  • DevOps Automation : Because there are a number of smaller components instead of a monolith application, you need to automate everything – Builds, Deployment etc.
  • Monitoring & Visibility : You now have a number of smaller components to deploy and maintain. Maybe 100, 1000 or maybe more. You should be able to monitor and identify problems automatically. You need great visibility around all the components.
  • Bounded Context : Deciding the boundaries of a microservice is not an easy task. Your understanding of the domain evolves over a period of time and so does the scope of a functionality. You need to ensure that the microservice boundaries evolve.
  • Configuration Management Solution : You need to maintain configurations for hundreds of components across environments so You would need a Configuration Management solution.
  • Configuration Management Solution : You need to maintain configurations for hundreds of components across environments so You would need a Configuration Management solution.
  • Fault Tolerance : If a microservice at the bottom of the call chain fails, it can have knock on effects on all other microservices. Microservices should be fault tolerant by Design so no other service bears its impact.
  • Debugging : When there is a problem that needs investigation, you might need to look into multiple services across different components. So the Centralized Logging and Dashboards are essential to make it easy to debug problems.

Solutions to Challenges with Microservice Architectures

One Stop solution – Spring Boot

  • Provide non-functional features
  • embedded servers (easy deployment with containers)
  • metrics (for monitoring)
  • health checks (for monitoring services)
  • externalized configuration

Summary

In this spring boot microservices tutorial you have learnt about monolithic and microservices architecture, challenges of monolithic arthictecure and how microservices overcome its challenges its uses advantages.
Hope you liked it !


Spring boot actuator and its endpoints

Spring Boot Actuator is a sub-project of Spring Boot. It provides several production ready features to any spring boot application. Once it is added in any spring boot application, it exposes a number of REST endpoints to monitor your application. You can monitor your application health, version details, thread dumps, logger details, application bean details, etc. without writing any code to avail these features.

After configuring spring actuator in your project, you get around 15 built-in endpoints to manage and monitor your application by default. The list of these endpoints are provided below. In case you require more control, you can also add your own endpoints. Not only this spring actuator also provide flexibility to rename the existing REST endpoints to any custom name you want.

Creating a Spring Boot application with Actuator

Two ways to do that:

  1. Using Spring.io initializr – also select Actuator jar along with others.
  2. By creating a spring boot project and adding Actuator Dependency to it.

This annotation is basically used on the class with main method, to mark the class as the main class of the application.

<dependency>
  <groupId>org.springframework.boot</groupId>
  <artifactId>spring-boot-starter-actuator</artifactId>
</dependency>
        

Where Spring boot Parent version is:

<parent>
  <groupId>org.springframework.boot</groupId>
  <artifactId>spring-boot-starter-parent</artifactId>
  <version>2.1.7.RELEASE</version>
  <relativePath/> <!-- lookup parent from repository -->
</parent>
       

And For Gradle,

dependencies {
  compile("org.springframework.boot:spring-boot-starter-actuator")
}
        

Monitoring your application through Actuator Endpoints

EndPointsAPI DescriptionDefault Value
actuatorIt provides a hypermedia-based “discovery page” for the other endpoints. It requires Spring HATEOAS to be on the classpath.True
auditeventsIt exposes audit events information for the current application.True
autoconfigIt is used to display an auto-configuration report showing all auto-configuration candidates and the reason why they ‘were’ or ‘were not’ applied.True
beansIt is used to display a complete list of all the Spring beans in your application.True
configpropsIt is used to display a collated list of all @ConfigurationProperties.True
dumpIt is used to perform a thread dump.True
envIt is used to expose properties from Spring’s ConfigurableEnvironment.True
flywayIt is used to show any Flyway database migrations that have been applied.True
healthIt is used to show application health information.False
infoIt is used to display arbitrary application info.False
loggersIt is used to show and modify the configuration of loggers in the application.True
liquibaseIt is used to show any Liquibase database migrations that have been applied.True
MetricsIt is used to show metrics information for the current application.True
mappingsIt is used to display a collated list of all @RequestMapping paths.True
shutdownIt is used to allow the application to be gracefully shutdown.True
traceIt is used to display trace information.True

Enabling and Disabling Actuator Endpoints

By Default it Exposes 2 endpoint(s) beneath base path ‘/actuator’

You can enable or disable an actuator endpoint by setting the property management.endpoint.id. enabled to true or false (where id is the identifier for the endpoint).

For example, to enable the shutdown endpoint, add the following to your application.properties file –

management.endpoint.shutdown.enabled=true

Exposing Actuator Endpoints

To enable the rest of the 15 endpoints , add the following to you applicaiton.properties

management.endpoints.web.exposure.include=*

Or if you want to expose only specific endpoint , then add the following to properties file

management.endpoints.web.exposure.include=health,info // this will enable only health and info rest end points.

Summary

In this spring boot actuator tutorial you have learnt about actuator and the amount of apis if offers to help you monitor and manage your applications health. These features you must add and explore in your spring boot application. Hope you liked it !


Spring boot rest api example – hello world

In this section We will learn to create a spring boot hello world rest api based application just by following 5 simple steps.

Here we GO !

Step 1 : Open Spring Initializr

Open Spring Initializr and create a spring boot rest project like below snapshot. Add the REST dependency and generate the project.

spring boot initializr

Add maven dependencies, These are the two dependencies which gets added on generating the above project.

<dependencies>
- <dependency>
    <groupId>org.springframework.boot</groupId>
    <artifactId>spring-boot-starter-web</artifactId>
  </dependency>
- <dependency>
    <groupId>org.springframework.boot</groupId>
    <artifactId>spring-boot-starter-test</artifactId>
    <scope>test</scope>
  </dependency>
</dependencies>
            

Spring Boot REST Controller – make a REST controller

  • @RestController Annotation used on the controller class.
  • @GetMapping & @PostMapping used to declare get and post apis.
  • Property consumes & produces used to consume and produce data of different types for example json, xml, html.

Step 2 : Create Get API

Create a class as below, copy and paste the code in you IDE.

import org.springframework.web.bind.annotation.GetMapping;
import org.springframework.web.bind.annotation.RequestBody;
import org.springframework.web.bind.annotation.RequestMapping;
import org.springframework.web.bind.annotation.RestController;

@RestController
@RequestMapping("api")
public class DepartmentController{

	@GetMapping("/hello")
	public String helloWorld() {

		return "Hello World !";

	}

	@GetMapping(path = "/dept", produces = "application/json")
	public Department getDepartment() {
		
		return new Department("Information Technology", "IT");	
	}	
}

Step 3 : Create Post API

Create a class as below, copy and paste the code in you IDE.

import org.springframework.web.bind.annotation.PostMapping;
import org.springframework.web.bind.annotation.RequestBody;
import org.springframework.web.bind.annotation.RequestMapping;
import org.springframework.web.bind.annotation.RestController;

@RestController
@RequestMapping("api")
public class DepartmentController{

  @PostMapping(path = "/dept", produces = "application/json", 
              consumes = "application/json")
  public String  addDepartment(@RequestBody Department department) {
    
    return department.getDepCode()+"--"+department.getDepName();
    
  } 
}        

Step 4 : main method using @SpringBootApplication

Create a class with main method as below, copy and paste the code in you IDE,
key point here is we are using @SpringBootApplication annotation to notify the framework that this is our main springboot class

package com.programmer.actuator;

import org.springframework.boot.SpringApplication;
import org.springframework.boot.autoconfigure.SpringBootApplication;

@SpringBootApplication
public class SpringbootprojectApplication {

  public static void main(String[] args) {
    SpringApplication.run(SpringbootprojectApplication.class, args);
  }

}         

Result

You can download a REST client or create your own and test the GET and POST apis as below.

GET API Response – When we hit the GET api see the snapshots below

spring boot initializr

POST API Response – When we hit the POST api see the snapshots below

spring boot initializr

Summary

In this section we learnt how to create a simple REST based project with SPRING BOOT. Hope you enjoyed it !