1xx: Informational – Communicates transfer protocol-level information 2xx: Success -Indicates that the client’s request was accepted successfully. 3xx: Redirection – Indicates that the client must take some additional action in order to complete their request. 4xx: Client Error – This category of error status codes points the finger at clients. 5xx: Server Error – The server takes responsibility for these error status codes.
Use HTTP status codes
200 – OK – Eyerything is working 201 – OK – New resource has been created 204 – OK – The resource was successfully deleted 304 – Not Modified – The client can use cached data 400 – Bad Request – The request was invalid or cannot be served. The exact error should be explained in the error payload. E.g. „The JSON is not valid“ 401 – Unauthorized – The request requires an user authentication 403 – Forbidden – The server understood the request, but is refusing it or the access is not allowed. 404 – Not found – There is no resource behind the URI. 422 – Unprocessable Entity – Should be used if the server cannot process the enitity, e.g. if an image cannot be formatted or mandatory fields are missing in the payload. 500 – Internal Server Error – API developers should avoid this error. If an error occurs in the global catch blog, the stracktrace should be logged and not returned as response.
Summary
In this tutorial we learnt about REST Http Status Codes, the Most used Http status codes and its meaning. Hope you liked the article !
To define, it means if REST APIs make multiple requests and have the same effect as making a single request then that REST call is called idempotent.
In a similar way, there are idempotent HTTP methods, that if called multiple times does not produce different outcomes.
Which methods are idempotent and which not?
GET, PUT, DELETE, HEAD, OPTIONS and TRACE are idempotent.
POST is NOT idempotent.
Understand WHY !
1. HTTP – GET, HEAD, OPTIONS and TRACE
These methods are for retrieving data so invoking these methods will not write any data to the server, hence these methods are idempotent.
2. HTTP – PUT
Usually – not always – PUT APIs are used for performing update operations to a resource/record. Even if the PUT API is being called N number of times, the very first call will do the update but the next N-1 calls will not do any change as they will just overwrite what has already been written, hence PUT is idempotent too.
3. HTTP – DELETE
When you invoke N number of DELETE requests, the very first request will delete the resource/record but the other N-1 calls to this method will not do any further deletions for Obvious reasons as the record has already been deleted, hence DELETE is idempotent.
4. HTTP – POST
Usually – not everytime – POST APIs are used to create a new resource/record on server. And if you make N number of requests, then N number of resources/records will be created on the server, hence POST is not idempotent.
Here in this tutorial we you will learn to create a java hello world application in docker.
Follow these steps to make a java application run in docker:
1. Create a directory
Create this directory Just to keep all the files in place and organize them.$ mkdir docker-java-app
2. Create a Java file
Create a sample java file inside the above created directory. For example name it as HelloWorld.java
$ cd docker-java-app
class HelloWorld{
  public static void main(String[] args){
    System.out.println("Hello World java app - in Docker");
    }
}
3. Create a Dockerfile
Dockerfile does not contain any file extension so please be careful in this with the name “Dockerfile”.FROM java:8 COPY . /var/www/java WORKDIR /var/www/java RUN javac HelloWorld.java CMD [“java”, “HelloWorld”]
4. Build Docker Image
Please make sure you run the docker build command in the directory where the Dockerfile is present, in our case it is the “docker-java-app” directory where both the files are kept.We can have any name for the image, for example here we named it as “java-hello-app”.$ docker build -t java-hello-appThis command will call the docker daemon to build this image.
5. Run Docker Image
Just a simple command to run the image$ docker run java-hello-appWhich should give the following output:Hello World java app - in Docker
Summary
In this tutorial we learnt how to create a docker based simple java application, we learnt how to build an image and run it on docker using docker command CLI.
Windows 10 64-bit: Pro, Enterprise, or Education (Build 15063 or later).
Hyper-V and Containers Windows features must be enabled.
The following hardware prerequisites are required to successfully run Client Hyper-V on Windows 10:
64 bit processor
4GB system RAM
BIOS-level hardware virtualization
Installation includes
Docker Engine
Docker CLI
Docker Compose
Docker machine
Kitematic
Installation Steps :
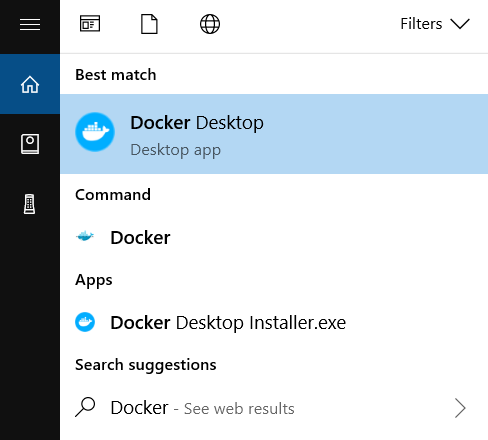
Download the installer from Docker HUB. Docker Desktop Installer.exe (sign up to start the download)
Follow the instructions which comes on the screen.
Click Finish to complete setup and start Docker desktop application
Test successful installation
Open the Docker desktop application
Open a command prompt and type $ docker -v If it returns the version it means docker is installed successfully.
And also test by typing $ docker run hello-world Should return a message “Hello from Docker!”
2. Docker installation on Linux
OS requirement
You will need 64 bit version of linux like Ubuntu.
Installation Steps
Install docker Engine first Update the apt package index: $ sudo apt-get update
Install packages to allow apt to use a repository over HTTPS: $ sudo apt-get install \ apt-transport-https \ ca-certificates \ curl \ gnupg-agent \ software-properties-common
Verify that Docker Engine – Community is installed correctly by running the hello-world image. $ sudo docker run hello-world Which should return a message “Hello from Docker!”
How Traditional Virtual Machines work Vs How Docker Virtualization works.
Traditional Virtualization by VMware/Hyper V
Docker Virtualization
Hypervisor layer – is the one which is used to host VMs
Docker Engine -is the one used to run the OS
Guest OS – Now you would install multiple Operating systems as VMs
Guest OS – is not required in dockers as the docker takes the host OS as its guest os.
Apps – hence you will now install apps on your guest OS
Apps – all the apps you want are run as docker containers.
Advantage over VMs – Does not require additional hardware like RAM for Guest OS as everything runs as docker containers on the Host OS.
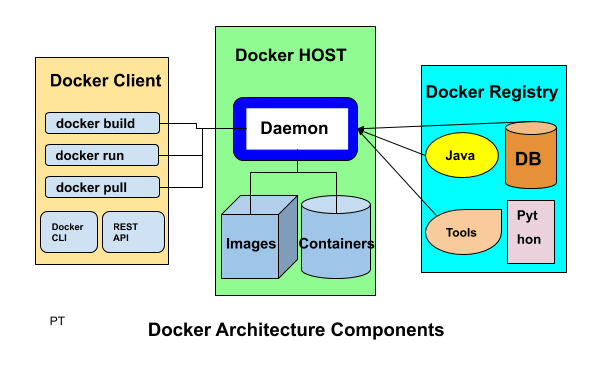
Docker Architecture
Docker High Level Components
1. Docker Client
Docker client enables user to interact with the docker daemon using docker CLI or REST API to do things like :
Docker build : to create an image
Docker run : to run the installed image
Docker pull : to pull the image from the registry
2. Docker Host
Docker host provides the complete environment to execute and run the applications. It consists of the docker daemon, images and the containers, network and storage.
It pulls the requested image from the docker registry and prepares a container of the image.
It is also used to create a bridge of network among the various docker instances running within the network to communicate with each other.
As storage it has options to mount data volumes, it mounts local directories to store data.
3. Docker Registry
Docker registry is an online repository from where you can download images.
Public docker registries includes the docker HUB, docker CLOUD and private registries can also be used.
Few of the common commands used:
docker pull : to pull image from docker registry
docker push : to publish image to the docker registry
Technology used to make Docker
Docker is written in go language and it takes advantage of several already built in features of Linux kernel to deliver its functionalities.
5. Create a Kafka test client – with main method in it and we poll the records.
package com.programmertoday.kafka;

import java.util.concurrent.ExecutionException;

import org.apache.kafka.clients.consumer.Consumer;
import org.apache.kafka.clients.consumer.ConsumerRecords;
import org.apache.kafka.clients.producer.Producer;
import org.apache.kafka.clients.producer.ProducerRecord;
import org.apache.kafka.clients.producer.RecordMetadata;

public class KafkaClient {

  public static void main(String[] args) {

    System.out.println("Kakfa Test in progress...........");
    executeProducer(); // if running producer, please commit the below line.
    //executeConsumer(); // if running consumer, please comment to above line.
  }

  static void executeConsumer() {
    Consumer<Long, String> consumer = KafkaConsumerClass.createConsumer();
    int noMessageFound = 0;
    while (true) { // condition set to true so that it keeps on running
      ConsumerRecords<Long, String> consumerRecords = consumer.poll(1000);
      // 1000 is the time in milliseconds consumer will wait if no record is found at
      // broker.
      if (consumerRecords.count() == 0) {
        noMessageFound++;
        if (noMessageFound > KafkaConstants.MAX_NO_MESSAGE_FOUND_COUNT)
          // If no message found count is reached to threshold exit loop.
          break;
        else
          continue;
      }
      // to print each record.
      consumerRecords.forEach(record -> {
        System.out.println("Record Key " + record.key());
        System.out.println("Record value " + record.value());
        System.out.println("Record partition " + record.partition());
        System.out.println("Record offset " + record.offset());
      });
      // commits the offset of record to broker.
      consumer.commitAsync();
    }
    consumer.close(); // to close the consumer
  }

  static void executeProducer() {
    Producer<Long, String> producer = KafkaProducerClass.createProducer();
    for (int index = 0; index < KafkaConstants.MESSAGE_COUNT; index++) {
      ProducerRecord<Long, String> record = new ProducerRecord<Long, String>(KafkaConstants.TOPIC_NAME,
          "This is a kafka record " + index);
      try {
        RecordMetadata metadata = producer.send(record).get();
        System.out.println("Record sent with key " + index + " to partition " + metadata.partition()
            + " with offset " + metadata.offset());
      } catch (ExecutionException e) {
        System.out.println("Error in sending record");
        System.out.println(e);
      } catch (InterruptedException e) {
        System.out.println("Error in sending record");
        System.out.println(e);
      }
    }
  }

}
Summary
Now you know how to create kafka producer, kafka consumer in java, we hope you enjoyed learning this.
E:\softwares\kafka_2.12-2.3.0>.\bin\windows\kafka-topics.bat --zookeeper lo calhost:2181 --delete --topic demotopic
Topic gets marked for deletion.
Summary
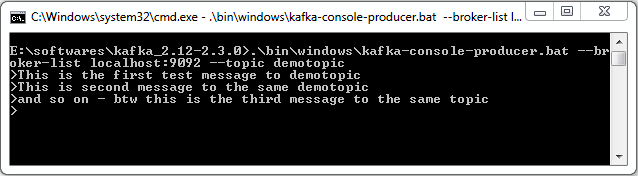
Now you know how to install kafka zookeeper on your windows system and also you have learnt how to create topic , list topic, produce message and consume message from a topic and last but not least delete a topic.
Read next article to know how to create Producer Consumer code in JAVA.
It is a group of computers , each executing same instance of kafka broker.
Broker
It is just a meaningful name given to the kafka server, kafka producer does not directly interact with the consumer, they use kafka broker as the agent or broker to interact. In a cluster there can be more than one brokers.
Brokers are stateless, hence to maintain the cluster state they use ZooKeeper.
Zookeeper
ZooKeeper is used for managing and coordinating Kafka broker. ZooKeeper service is mainly used to notify producer and consumer about the presence of any new broker in the Kafka cluster system or failure of the broker in the Kafka cluster system. As per the notification received by the Zookeeper regarding presence or failure of the broker then producer and consumer takes decision and starts coordinating their task with some other broker.
Producers
Producer is a component which pushes data to the brokers, it doesn’t wait for acknowledgement from the brokers rather sends data as fast as the brokers can handle. There can be more than one producers depending on the use case.
Consumers
Since Kafka brokers are stateless, which means that the consumer has to maintain how many messages have been consumed by using partition offset. If the consumer acknowledges a particular message offset, it implies that the consumer has consumed all prior messages. The consumer issues an asynchronous pull request to the broker to have a buffer of bytes ready to consume. The consumers can kind of rewind or skip to any point in a partition simply by supplying an offset value. Consumer offset value is notified by ZooKeeper.
Kafka topic
A kafka topic is a logical channel to which producers publish messages and from which the consumers receive messages.
A topic name must be unique so that it is identifiable by both producer and consumer, there can be any number of topics, we cannot modify the data once published.
A Topic may contain any number of partitions as shown in the picture above.
Partitions in kafka
As you know broker store data of a topic, this data can be huge, break the data into two or more parts and distribute it to multiple computers.
In a Kafka cluster, Topics are split into Partitions and also replicated across brokers.
One can also add a key to the message to get ensured that all the messages with this key will end up in the same partition if the message is produced with the key. Because of this kafka also offers message sequence guarantee.
Otherwise without a key data is written to partitions randomly.
Offset
It is the sequence id given to a message in a partition, an offset is local to a partition, There can be any number of partitions, with no limitations to it.
— partition 1
— partition 2
Each partition sits on a single machine.
Note: How to directly locate a message ?
You need to know 3 things:
Topic name
Partition number
Offset
Topic replication factor
It is always a good design decision to have a replication factor of a topic. It helps when a broker goes down the replica will still have the topic data. For example if the replication factor is 2 then a broker will have atleast one additional copy other than the primary.
Replication takes places at partition level only.
There has to be a leader among Brokers for a given partition and that will be only one. The number of replication factor cannot be greater than the number of available brokers.
Consumer Group
Scenario : when hundreds of producers produce data to a single consumer, it’s hard to manage its volume and velocity.
Partitioning and consumer group is a tool for scalability, Maximum number of consumers in a group is equal to the total number of partitions you have on the topic.
Kafka doesn’t allow more than 2 consumers to read data from the same partition.
Also one consumer group will have one unique group id.
Summary
We learn about Kakfa features, its uses, usecases and core apis, Hope you liked it !
In this tutorial we will learn how to create a form in angular 7 application. We will make a form like below.
Before we head to create the form, let’s understand the basics:
There are 2 types of forms :
1. Template driven forms
2. Model driven or Reactive forms
1. Template driven forms
The template driven approach makes use of built-in directives to build forms such as ngModel, ngModelGroup, and ngForm available from the FormsModule module.
When to use ?
where forms are small
Simple validations
migrating from angular 1 to angular 2
Advantage:
easier to create
less code
2. Model driven or Reactive forms
The model driven approach of creating forms in Angular 6 makes use of FormControl, FormGroup and FormBuilder available from the ReactiveFormsModule module.
When to use ?
Where forms are big
validations are complex
Reactive forms have majorily two classes:
FormGroup : can be considered as a collection of FormControls and other FormGroups
FormControl : to bind the properties with the html elements
At first, we will create an instance of FormGroup class and link it to the html form. Then, we will create a number of instances of FormControl as many number of form elements.
Let’s Begin !
Step 1: Registering the reactive forms module in app.module.ts
import { ReactiveFormsModule } from '@angular/forms';